Your node has a massive amount of storage. Carve it into spaces, share it with your team, and upload your content. Toss out the closet full of hard drives.
When you first log into the management interface, you arrive at the system section. This section describes how the node's storage is allocated, how the node is connected to your network, who is connected to it, what tasks are running, and what hardware is inside the node.
creativespace.local/node
Use the system section to:
allocate storage
connect the node to your network
You can also use the system section to:
snapshot your content
see who is connected to the storage
configure services
restart the node
The team section lists all of the user accounts that can access content on the node. When you first log in, this page will contain two accounts: your admin account, and a Creative Support account, which our support staff will use in case you need them to access the node.
creativespace.local/team
Use the team section to:
create user accounts
You can also use the team section to:
let other people manage the node
organize information about each of your team members
deactivate user accounts
The spaces section is a file browser that shows you all of your content. When you first log in, the spaces page will be empty. As you upload content to the node, it will appear here.
creativespace.local/files/spaces
Use the spaces section to:
upload your content
share your content over your network
grant access to your content
You can also use the spaces section to:
view and organize your content
review your content's metadata
search for content
make templates for your content
The monitor section provides a dashboard with gauges and graphs that display system resources over the past 10 minutes. Every second the node collects over 2,000 metrics, that can be presented as hundreds of charts, and is currently monitored by approximately 150 potential alarms. Some of these charts are displayed on this page.
creative.space lets you share content with everyone you work with. All you need to do is add them to your team. Your team consists of user accounts, which can be organized into groups and sorted into roles.
Your user account is your passport to the node. It determines what content can access, and what kinds of changes you can make to the node. Your account is a system administrator account. You can access everything on the node, from the content stored in it, to the management interface. Most notably, you have the power to grant others access to the node, by creating user accounts for them.
As the system administrator, you decide which spaces each user can access, and what each user can do in the management interface.
TIP
Create a separate account for everyone you work with. Do not share a single user account among different team members.
To create a user account:
Click .
Click and then .
Use to select or upload a profile picture for the new user.
Use to enter a username for the new user.
WARNING
No two users can have the same username.
Make sure you pick a unique username for each user you make. If you try to give a user a username that already belongs to another user, the management interface will refuse to create another user.
Once a username has been used, it can never be re-used.
Even if you deactivate a user, you cannot re-assign its username to any other user, ever. Choose wisely.
You cannot change a user's username once you have set it.
If you have a large team, you can organize each team member into one or more groups. A group is a set of user accounts. A user account can be included in as many or as few groups as you want. Groups make it easy to grant all the user accounts included within them access to the same space.
To create a group:
Go to .
Click on and then on .
Use to enter a group name. Then click .
TIP
Create groups that match your organization's structure. For example, if your organization has a group of editors, a group of animators, a group of VFX artists, and a group of production managers, make one group for each of these roles.
TIP
You can put a user in more than one group. For example, if your organization has someone who edits and animates, you can add their user account to both the editor and animator groups.
WARNING
If you delete a group, you will not delete any of the users within that group. However, you will revoke all of the access that the group conferred upon the included users.
A space is a portion of the node's storage. It is a versatile way to organize, protect and restrict access to your content.
By default, spaces stretch to fit the content you place within them. However, you can limit how large a space can grow, and you can also limit how small a space can shrink.
Each space can have its own set of access restrictions. By default, no one can access a space except for the person who created it. However, you can always grant users and groups permission to access a space.
Click .
Use to enter a name for your space. Keep in mind that names cannot start with a number, and cannot contain spaces or punctuation.
Each space can be shared over your network. This means that you can access it from any workstation on your network. How you connect to a space varies depending on your workstation's operating system:
Choose your workstation's operating system:
MacOS 10.15
CATALINA
Windows 10
MAY 2020 UPDATE
CentOS 7.8
Build 2003
Click on . Next, find the space you want to share, and then click on the .
Click on . The link to access the space will be copied to your computer's clipboard.
Open Finder.
Click on .
Click on .
Paste the link you copied in step 2 into . Then, click .
The first time you connect to the node, MacOS will ask you to confirm that you want to connect. Click again.
Enter the username you use to log into the node in and the password you use to log into the node in . Then, click . Your space will show up as a network share in the Finder.
Click on . Next, find the space you want to share, and then click on the .
Click on . The link to access the space will be copied to your computer's clipboard.
Click on .
Paste the link you copied in step 2 into and then click .
Enter the username you use to log into the node in and the password you use to log into the node in . Then click . Your space will show up as a network share.
Click on . Next, find the space you want to share, and then click on the .
Click on . The link to access the space will be copied to your computer's clipboard.
Go to , then select .
Select the network destination you want to connect to. In this case, it's CREATIVESPACE.
Select the space you want to connect to. In this case, it's my-content.
Select . Then enter the username you use to log into the node in , enter WORKGROUP in and the password you use to log into the node in . Finally, click .
What do I do if I can't see my node on in the CentOS Network Browser?
Your workstation's network browser needs to use multicast domain name system (mDNS) to find the node on the network. If your workstation's firewall blocks mDNS, the node will not show up in the network browser. Fortunately, it's easy to unblock mDNS:
Go to , then , and select .
Enter the password you use to log into your workstation into , and click .
Check in > section of Firewall Configuration. Then close the window.
Under routine post-production workflows, remote access to shared storage was challenging. Now with a pandemic, creatives require twenty-four-hour access and collaboration from any location. VPN, WAN, and Internet access to shared projects and files present technical challenges that can be difficult to overcome, especially for small production teams. creative.space has integrated ZeroTier’s VPN and SD-WAN technology on its easy, reliable, and secure storage platform to empower the creative process.
Collaborative storage is the main hub connecting remote locations.
Now, effortlessly control team and device access to your creative.space storage from anywhere and anytime. Create secure networks between on-premise, cloud, desktop, and mobile devices. Easily provision and de-provision remote access authorization for users, freelancers, and clients. We simplify your network stack by unifying VPNs, VLANs, and SD-WANs into one solution. The creative.space storage seamlessly interacts with ZeroTier’s zero-trust networking software to provide scalable security, peer-to-peer (P2P) connections, and 256-bit end-to-end encryption.
What does this mean for your workflow? The bottom line is that you can quickly provide secure SMB (Network Share) and FTP remote access to folders and files on your shared storage. As an example, the SMB connection smb://192.168.1.33/dailies, works the same as if you were onsite. Just be aware that you may need to adapt your projects to account for bandwidth speed and latency. We can assist you in implementing a proxy-based workflow.
FTP is excellent for transferring multiple directories and files to and from your creative.space storage. Another advantage of FTP is the ability to continue transferring files even if the connection is lost. In case you accidentally lose your connection or have to reboot your computer, you don’t have to worry about starting from the beginning again. You can pick up right from where you left off.
What is a Virtual Private Network? Should I enable it?
A virtual private network (VPN) is a way to connect your workstation to your node, even when they aren't on the same network. From a technical standpoint, a VPN modifies the connection between your workstation and the node so that it looks like both are on the same network. It also makes it impossible for workstations that are not on the VPN to connect to the node.
To use a VPN, you need to install special software on your workstation. This software takes care of modifying and securing the connection between your workstation and your node.
Securely authorize users and devices, and configure networks all within the creative.space web app. This integration saves multiple manual steps and needed IT security knowledge if only using the ZeroTier administration website. There are two levels of authorization for users to access the creative.space storage. The first is ZeroTier for encrypted network access. The second is the creative.space LDAP server to control user rights and folder/file permissions. Think of it as a locked gate and front door. You must have the right keys to both before you can get inside.
ZeroTier offers a free Basic account for up to 50 network members and 1 admin. Their Professional account increases the numbers to 500 network members and 10 admins for $49 per month. You can always start with their free account and then upgrade as your requirements change.
Before you can set up zerotier, you will need to make sure this port is open on your gateway:
Port Number
TCP/UDP
Inbound/Outbound
Why?
9993
UDP
Inbound and Outbound
Zerotier uses port 9993 to receive incoming connections.
What is a port? How do I know if it is open?
A port is a destination within an IP address. Every IP address has tens of thousands of unique ports. Any software that wants to send or receive data over a network needs to pick an IP address, and then occupy one or more of that address's ports.
A gateway is a device that connects your computer to the internet. Most routers and some managed switches can function as gateways. Your gateway has an IP address, and therefore, it has ports.
Your node accesses the internet through your gateway. That means that any software that runs on your node needs to send its traffic through your gateway to get to the internet. Since the Zerotier VPN client software runs on your node, it needs to send its traffic through your gateway in order to get to the internet.
The Zerotier VPN software (Zerotier) uses a single port. That port has a port number of 9993. A port number is a number that is unique to a port. It differentiates that port from the other ports in the IP address.
Zerotier needs to send its traffic through port 9993 on your gateway's IP address. If your gateway has a firewall enabled, it might not allow Zerotier to send its traffic through that port. If this is the case, you will need to open port 9993 on your gateway. Opening a port is the process of configuring your gateway's firewall so that it does not block traffic on the port.
The easiest way to check if a port is open is simply to set up the Zerotier VPN, and then check if you can connect to it over the internet. If you can, you do not need to open any ports. If you cannot, you will need to open port 9993 on your gateway. You will need to consult your gateway's user manual to find out how to open a port.
We also recommend that you open the following ports. While you do not have to open them, it helps us help you if you do:
Port Number
TCP/UDP
Inbound/Outbound
Why?
22
TCP
Outbound
We use port 22 to apply software updates and provide remote support.
53
TCP and UDP
Outbound
The node's network interfaces use port 53 to connect to Domain Name Services (DNS). Without this port, you cannot configure any network interfaces to use a custom DNS.
80
TCP
Outbound
The node's management interface uses this port to show up in your web browser
123
TCP and UDP
Outbound
The node uses this port to get the time from a Network Time Protocol (NTP) server. Without this port, you cannot connect your node to an external NTP server.
443
TCP
Outbound
The node uses this port to send you email notifications
12975
TCP
Outbound
We use port 12975 to apply software updates and provide remote support.
32976
TCP
Outbound
We use port 32976 to apply software updates and provide remote support.
# Get a Zerotier API Access Token and Add It to Your Node
Create a ZeroTier account and log in to your account at my.zerotier.com. Then Select from the top menu bar.
Scroll down to the API Access Tokens section. Then click on .
Use to give your token a name that matches your node, and then click .
Copy the API Token.
Warning
Do NOT share this token with anyone. It gives whoever has it administrative access to your zerotier account.
Keep a copy of this token in a secure place, such as a password management application. Zerotier will never show this token to you again. If you lose it, you will have to start these steps over.
Go to the system page, then click on the in the zerotier networking panel. After that, click
Paste your Zerotier API Token into Then, click
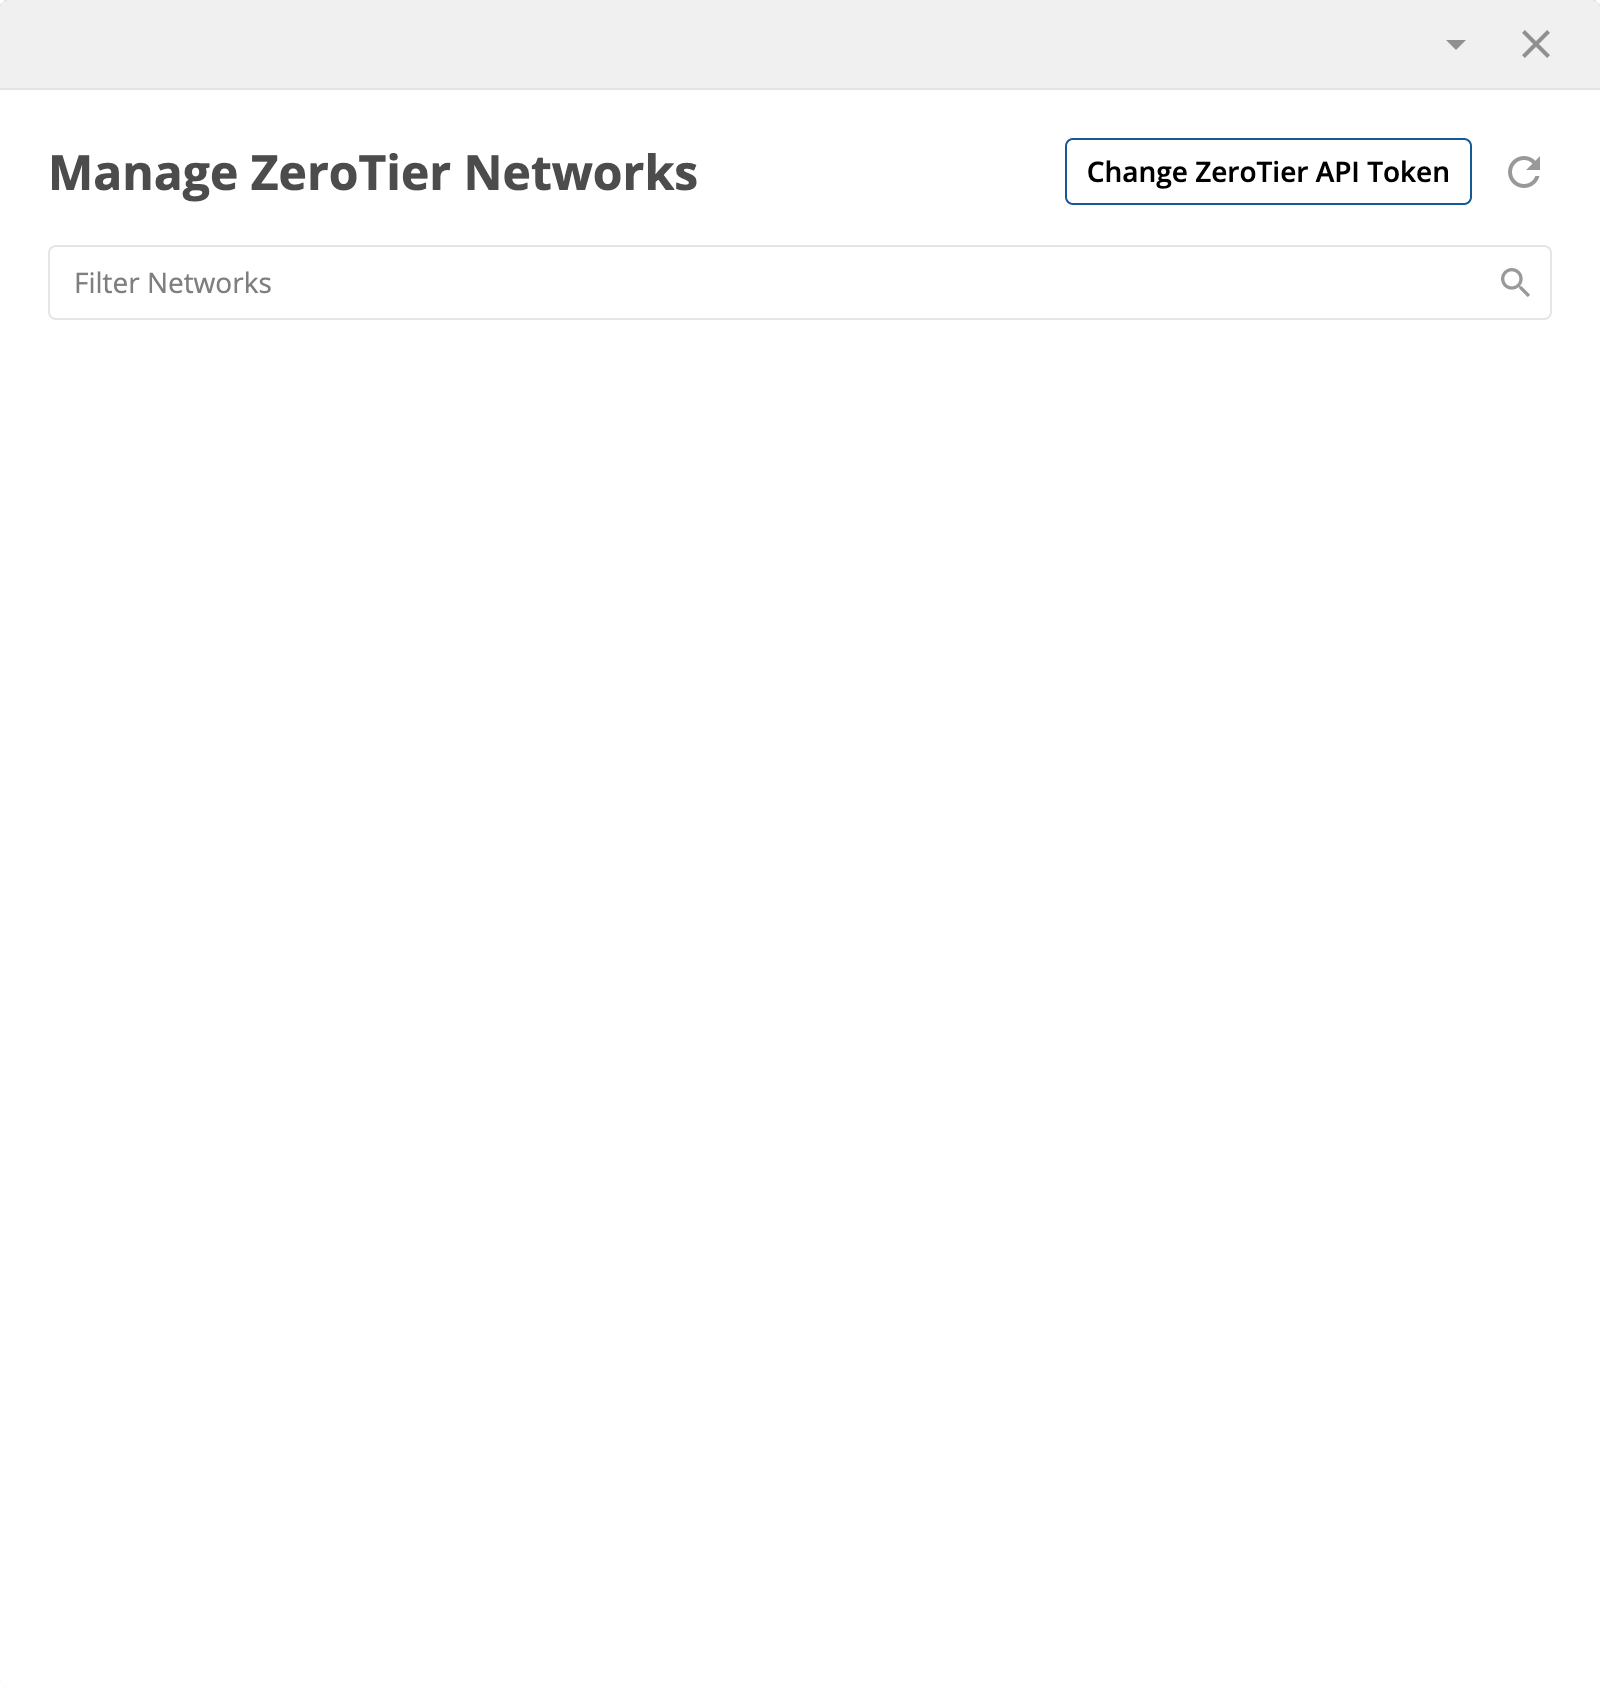
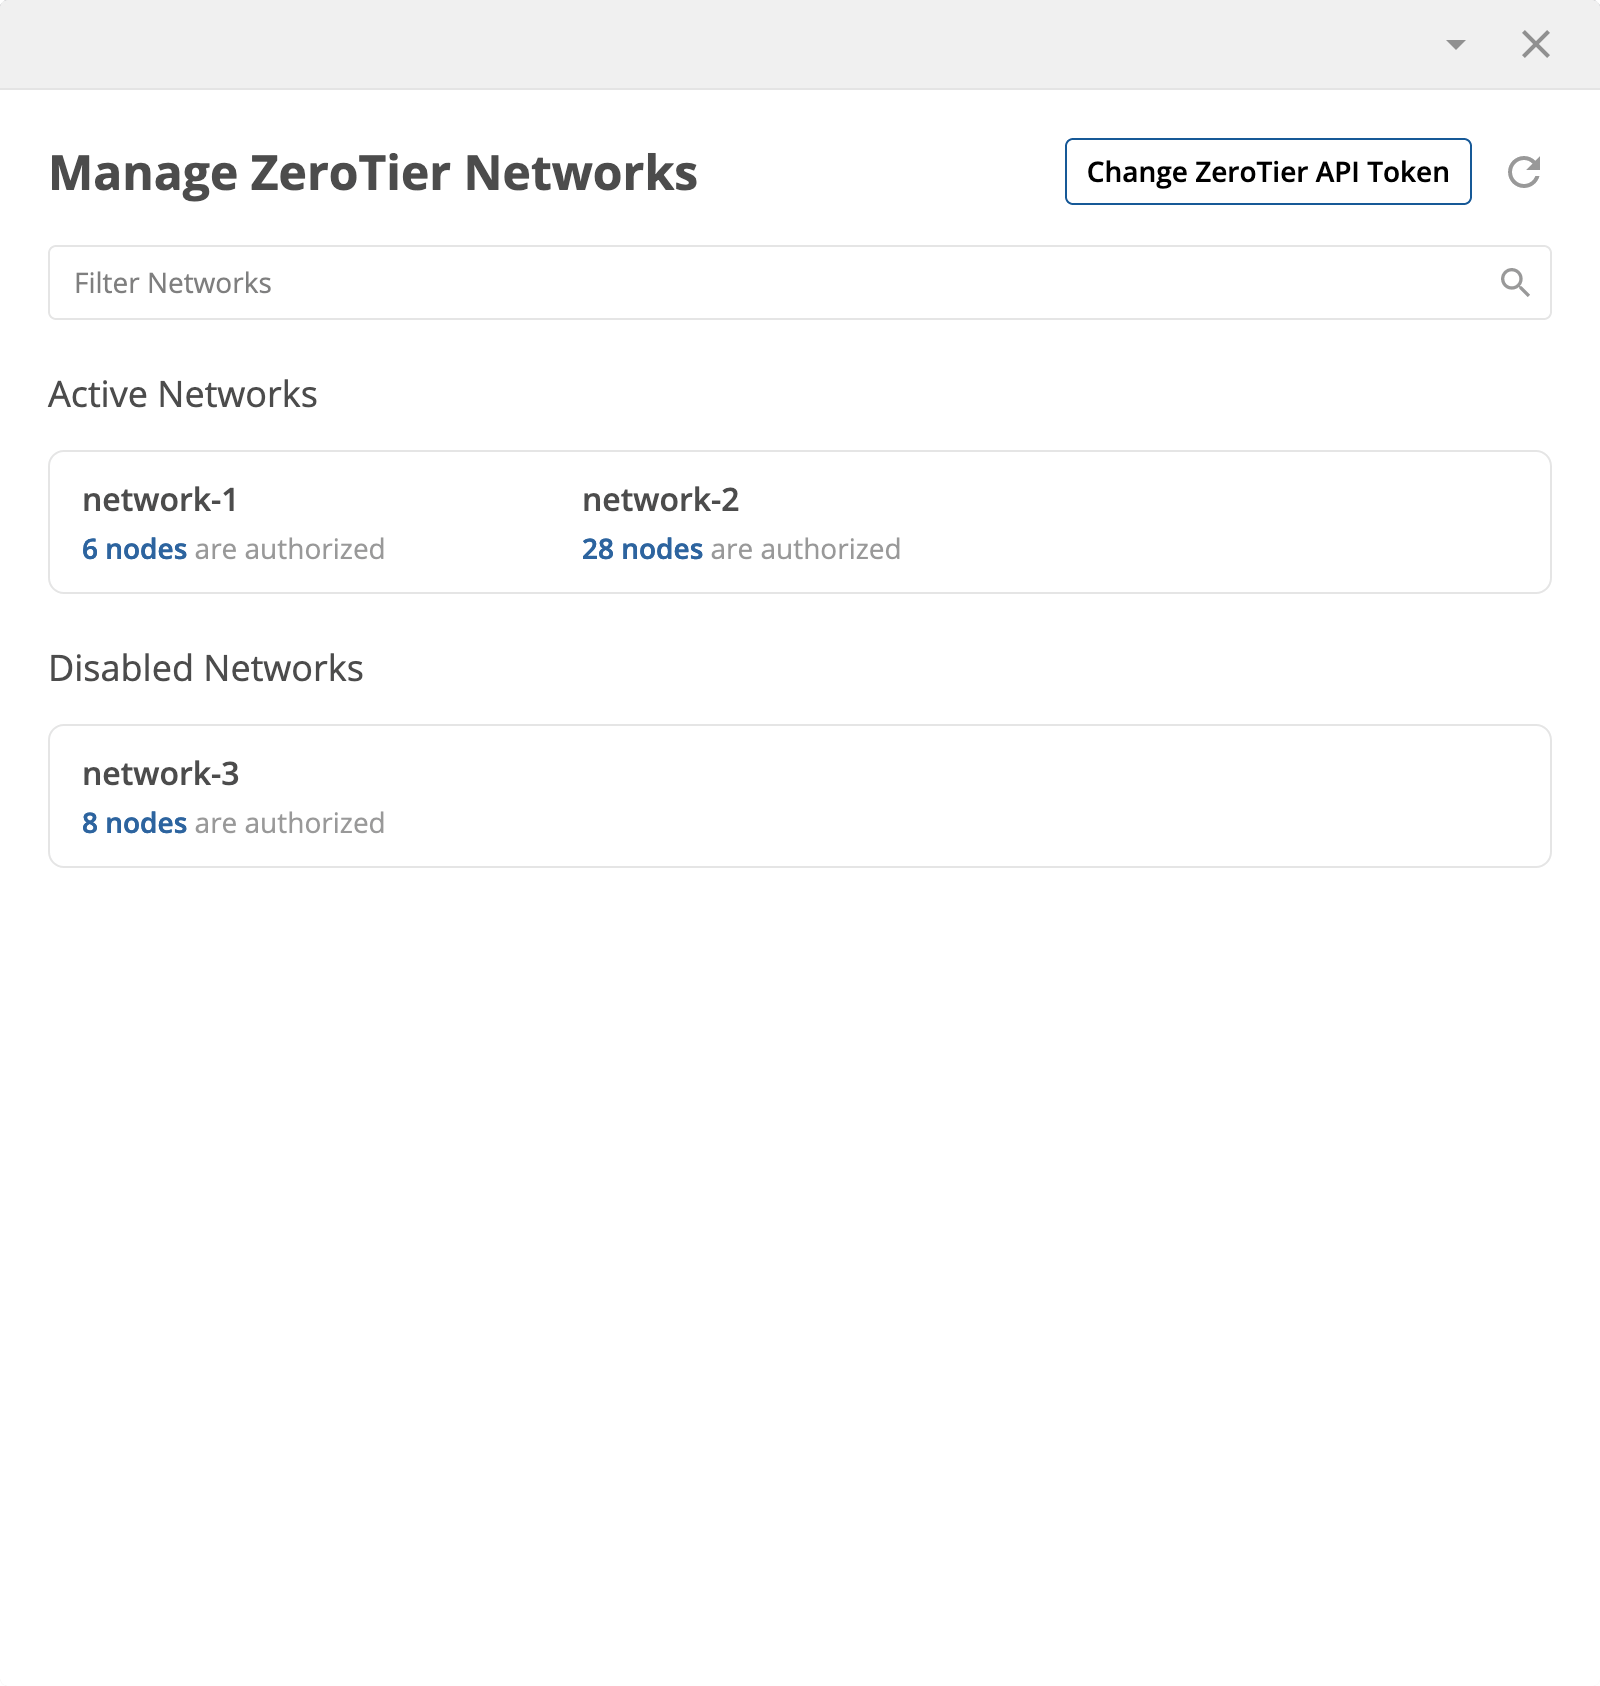
The “Manage ZeroTier Networks” panel will appear. It will be empty if there are no networks configured. If you have existing networks, you can manage them from this panel.
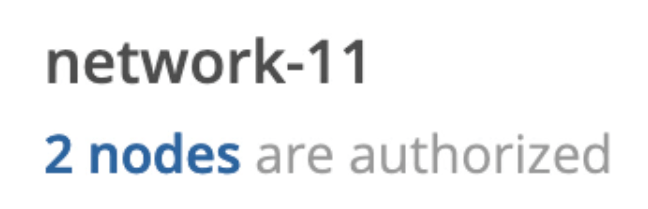
The configuration panel is divided by Active Networks, Disabled Networks, and Available Networks. This is based upon the current status of your creative.space storage within each network. It also displays the number of nodes authorized for each network. A “Node” is a device on the network. A user’s name is automatically added to the node description field. A user can have multiple devices such as a desktop, laptop, and iPad authorized on multiple networks, each with a separate “Node ID”.
Use to update the token you use to connect to your ZeroTier account. This token allows the creative.space management interface to communicate with ZeroTier.
Use to search among the ZeroTier networks associated with your account.
creativespace.local/system
The Active networks section lists the networks that your node is connected to. If your node is connected to a network, it can connect to the other nodes on the network. In this case, a node can be another creative.space node, or a workstation.
creativespace.local/system
The Disabled networks section lists the networks on your ZeroTier account that nothing can connect to. To use these networks, you must first enable them.
creativespace.local/system
The Available networks section lists the networks on your ZeroTier account that you can connect your creative.space node to. Once you connect your node to an available network, the network will move to the active networks section.
creativespace.local/system
Use and to create a new ZeroTier network with a name and IP address range of your choice. The network will show up in the Available Networks section as soon as you create it.
creativespace.local/system
# Install the ZeroTier and creative.space Desktop Applications on your Workstation
Download and install both the ZeroTier One and creative.space desktop applications.
Open the creative.space desktop application. Then, click . After that, click .
Locate the ZeroTier Node ID in the Settings panel of the desktop app. Then copy .
Go to your creative.space node's management interface. Then, click the in the top right corner of the ZeroTier Section of the System Page.
Use to select the network you want to add your workstation to.
Click .
Select your user account from the Send Network Invitation menu. Then paste your workstation's ZeroTier Node ID into . Next, type a memorable name for your workstation into . Finally, click to send an invitation to the email associated with your creative.space login.
Open the invitation you received in the email associated with your creative.space login. Then, open the .creative file attached to it.
Go to the desktop app, then click .
Use to enter the username you use to connect to your node, and use to enter the password you use to connect to your node. Then, click .
# Additional Configuration and Monitoring - "System" Page
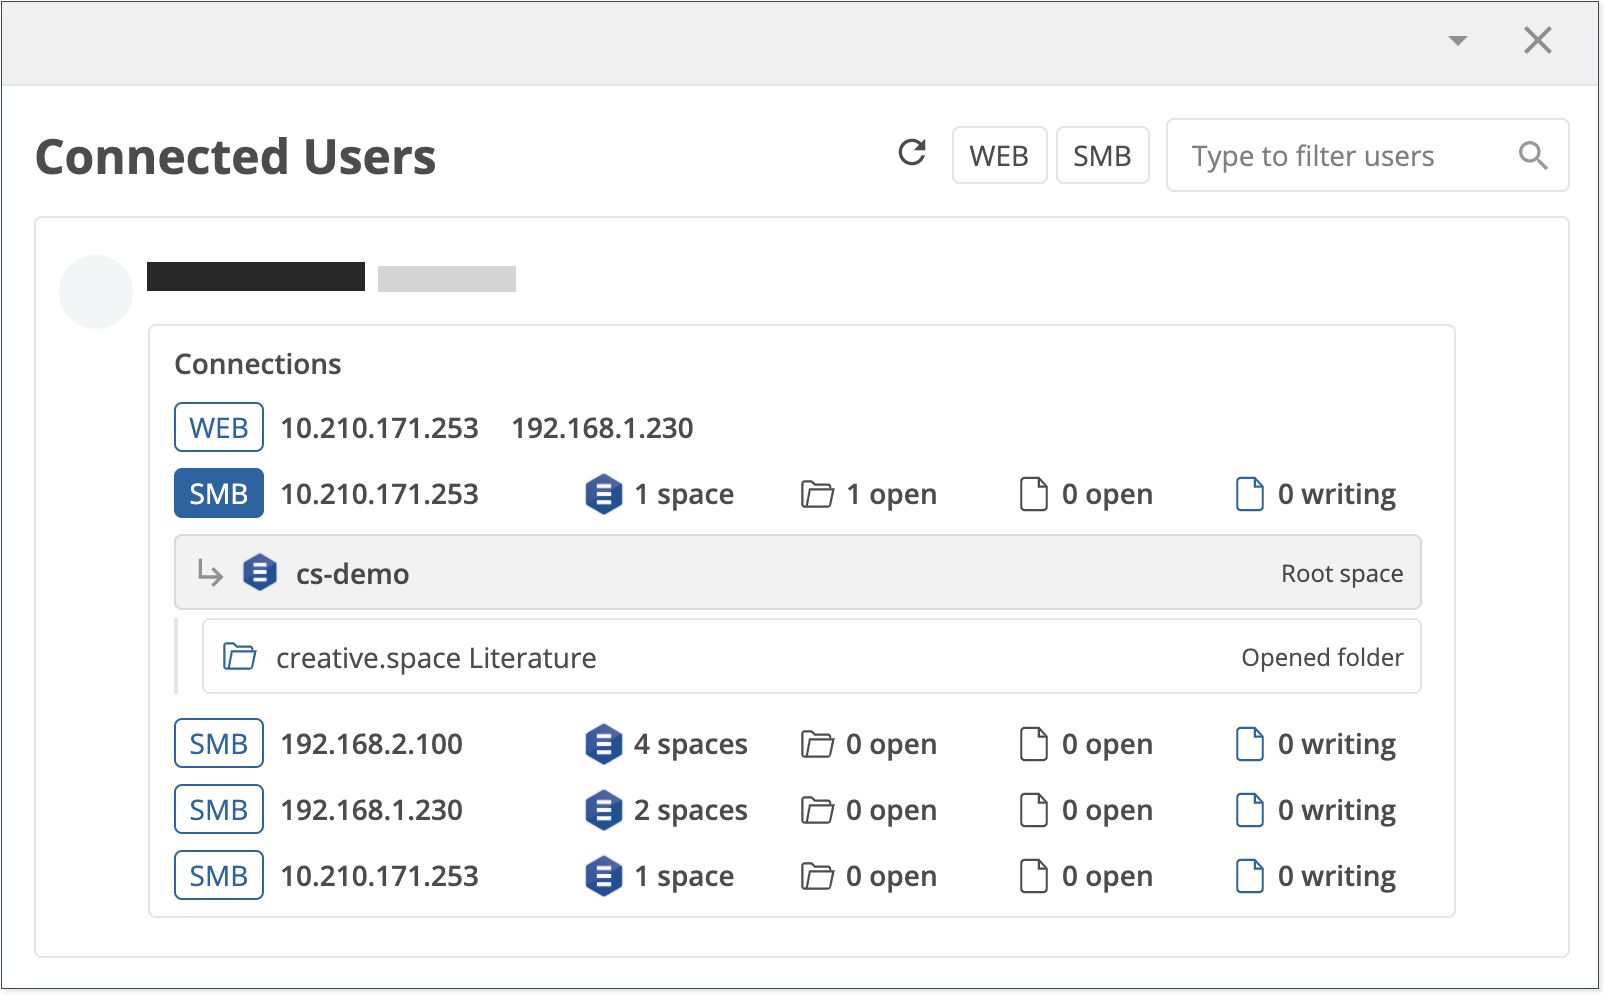
Click the “View Connected Users” button in the Connected Users Panel. It will display connected users, and you can monitor what Spaces, Folders, and Files are being accessed. This is great for troubleshooting or looking for detecting suspicious activity. If a user’s credentials are being used from multiple IP locations, then they may be compromised or shared.
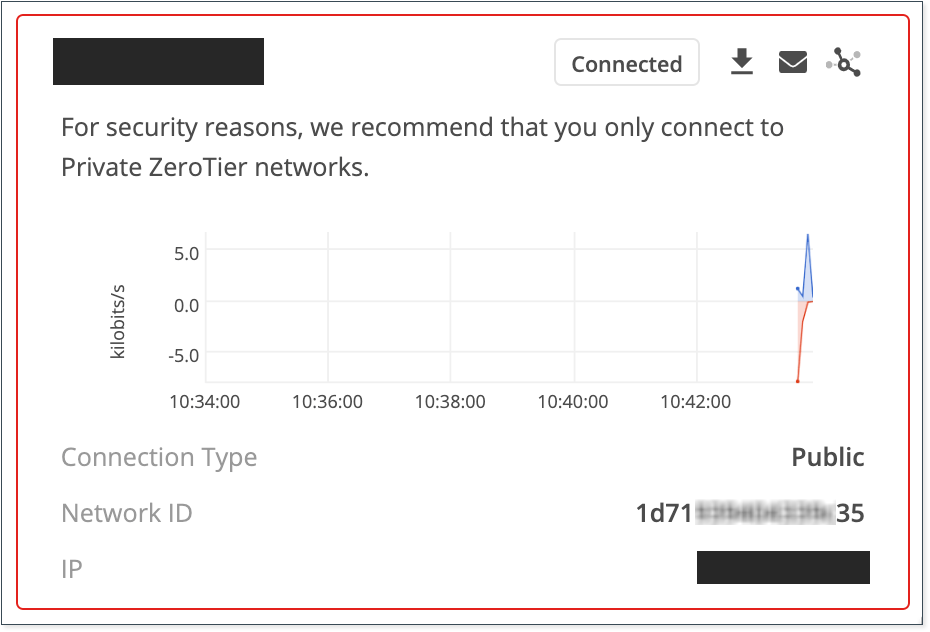
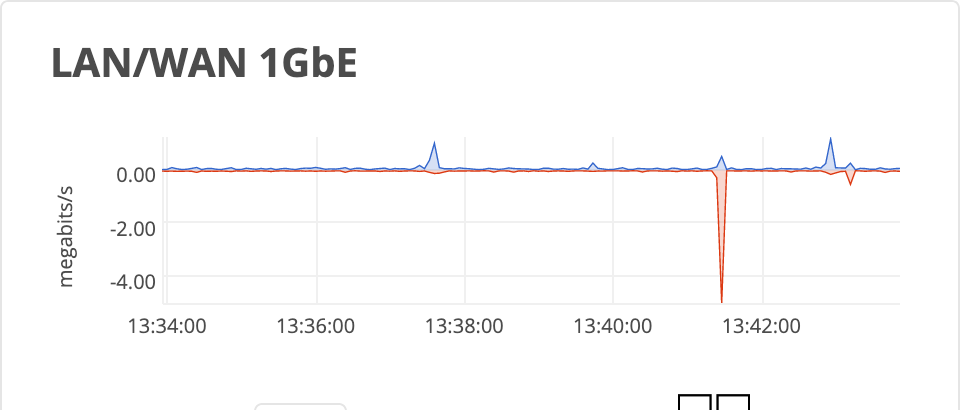
In the ZeroTier Network panel, you can view Active and Disabled networks. For “Active Networks,” you have a graphical chart displaying network bandwidth speed and activity. The “Connection Type” Private or Public, “Network ID”, and IP address of the storage is shown.
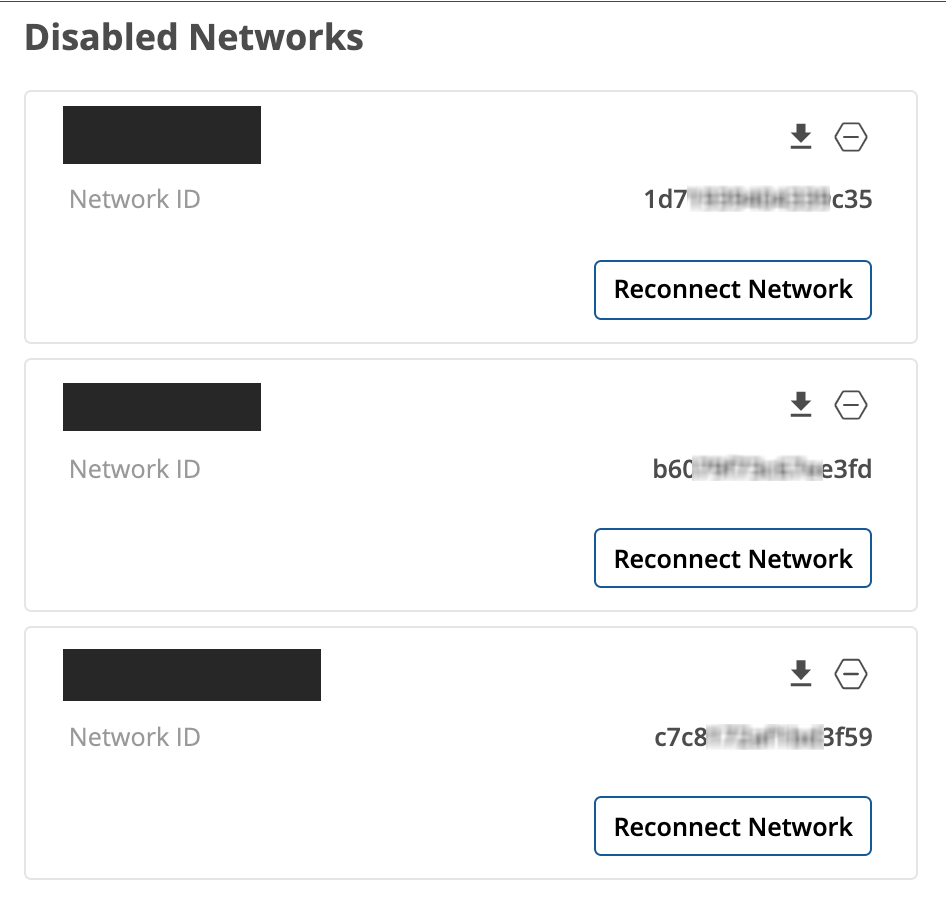
“Disabled Networks” display networks that the storage has been disabled on. Click the “Reconnect Network” button to make live and reachable again.
Through the creative.space web app, you can only create “Private” networks. If you wish to create a “Public” network not requiring node authorization, it must be done on the ZeroTier administration website. If a network is configured for “Public”, the panel will display it with a red border and warning message.
At the bottom of the ZeroTier panel is a section to add a ZeroTier Network ID that is not on your ZeroTier account. It will automatically add the network, but you will need to add the storage Node ID and approve it manually on the ZeroTier administration website.
Add the ZeroTier Network ID and click the “Add” button.
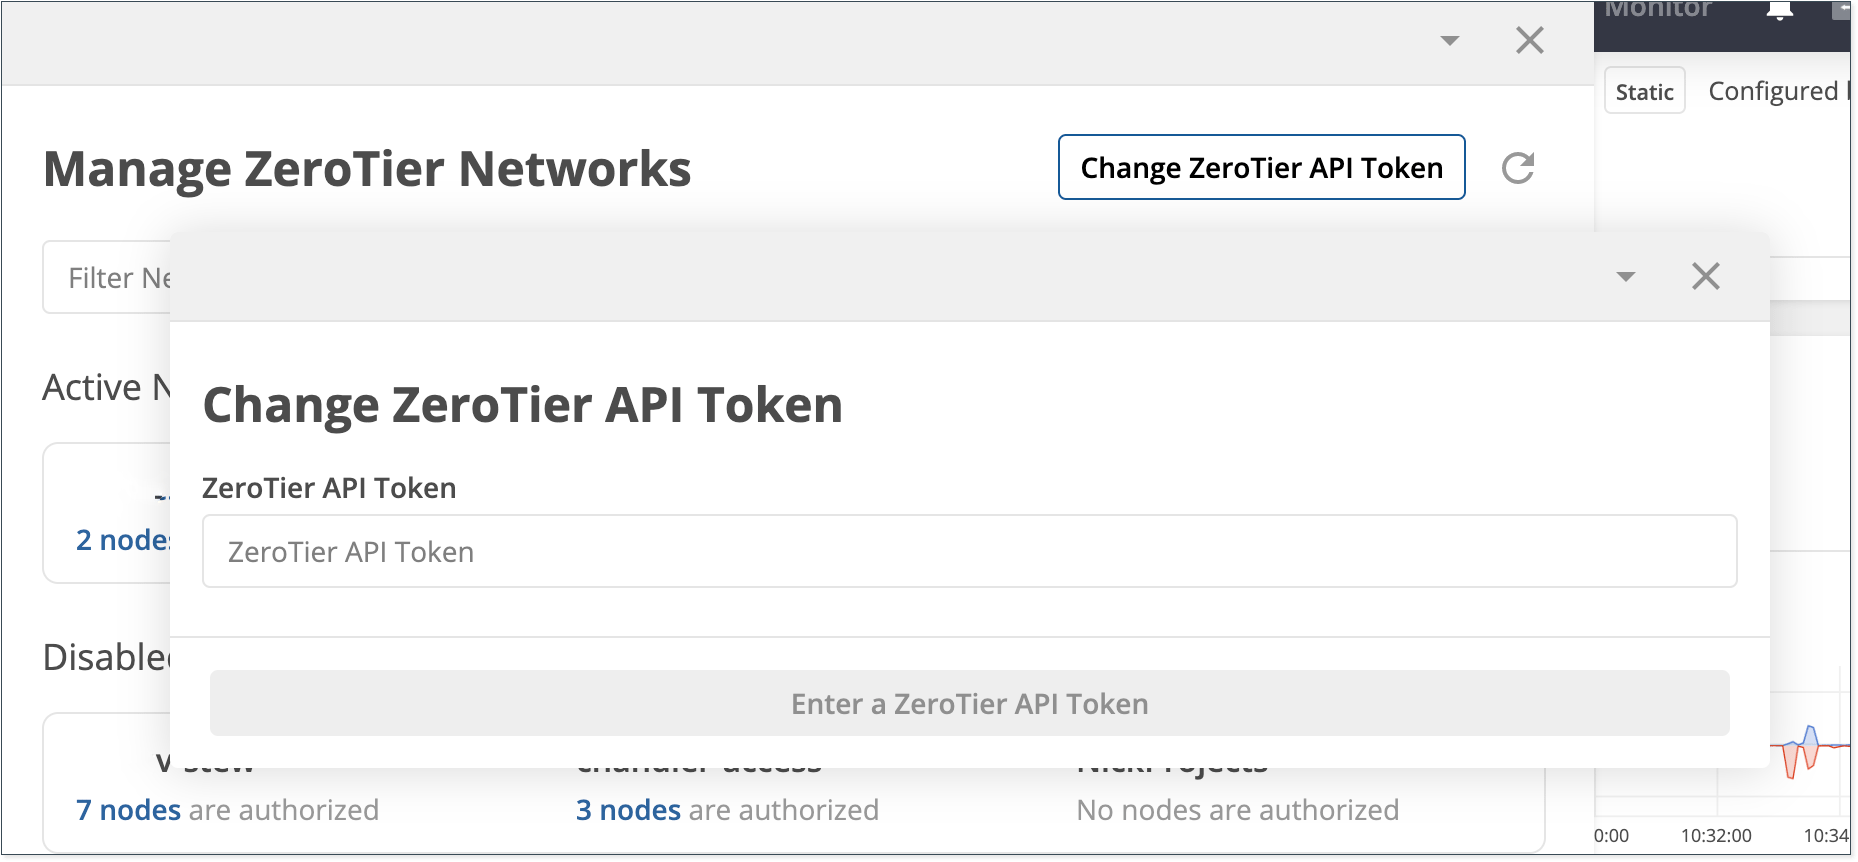
On the “Manage ZeroTier Networks” panel, there is a “Change ZeroTier API Token” button. Click this to change the API token if needed.
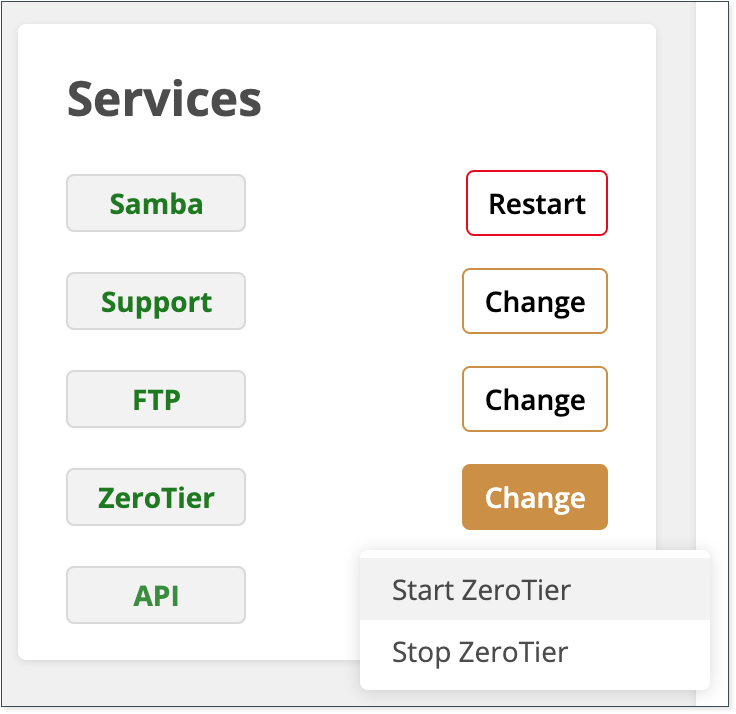
In the “Services” panel, you can Start and Stop the ZeroTier service if needed. Click on the “Change” button and select “Start ZeroTier” or “Stop ZeroTier”.


 .
. and then
  .
. to select or upload a profile picture for the new user.
 to enter a username for the new user.
 to set a password for the new user.
 to select the
  to enter the user's first and last name.
 to enter the user's email address.
 to enter the user's phone number.
 to select where you would like the node to send notifications.
 .
. .
. and then on
  .
. to enter a group name. Then click
  .
. .
. to enter a name for your space. Keep in mind that names cannot start with a number, and cannot contain spaces or punctuation.
 .
. .
. . Next, find the space you want to share, and then click on the
  .
. . The link to access the space will be copied to your computer's clipboard.
 .
. .
. .
. . Then, click
  .
. and the password you use to log into the node in
  . Then, click
  . The link to access the space will be copied to your computer's clipboard.
 .
. and then click
  .
. and the password you use to log into the node in
  . Then click
  . Your space will show up as a network share.
 , then select
  .
. you want to connect to. In this case, it's
  you want to connect to. In this case, it's
  . Then enter the username you use to log into the node in
  , enter
  and the password you use to log into the node in
  . Finally, click
  .
. , then
  , and select
  .
. .
. in
in  >
>  section of Firewall Configuration. Then close the window.
 from the top menu bar.
 .
. to give your token a name that matches your node, and then click
  .
.
 Then, click
 to update the token you use to connect to your ZeroTier account. This token allows the creative.space management interface to communicate with ZeroTier.
 to search among the ZeroTier networks associated with your account.


 and
and 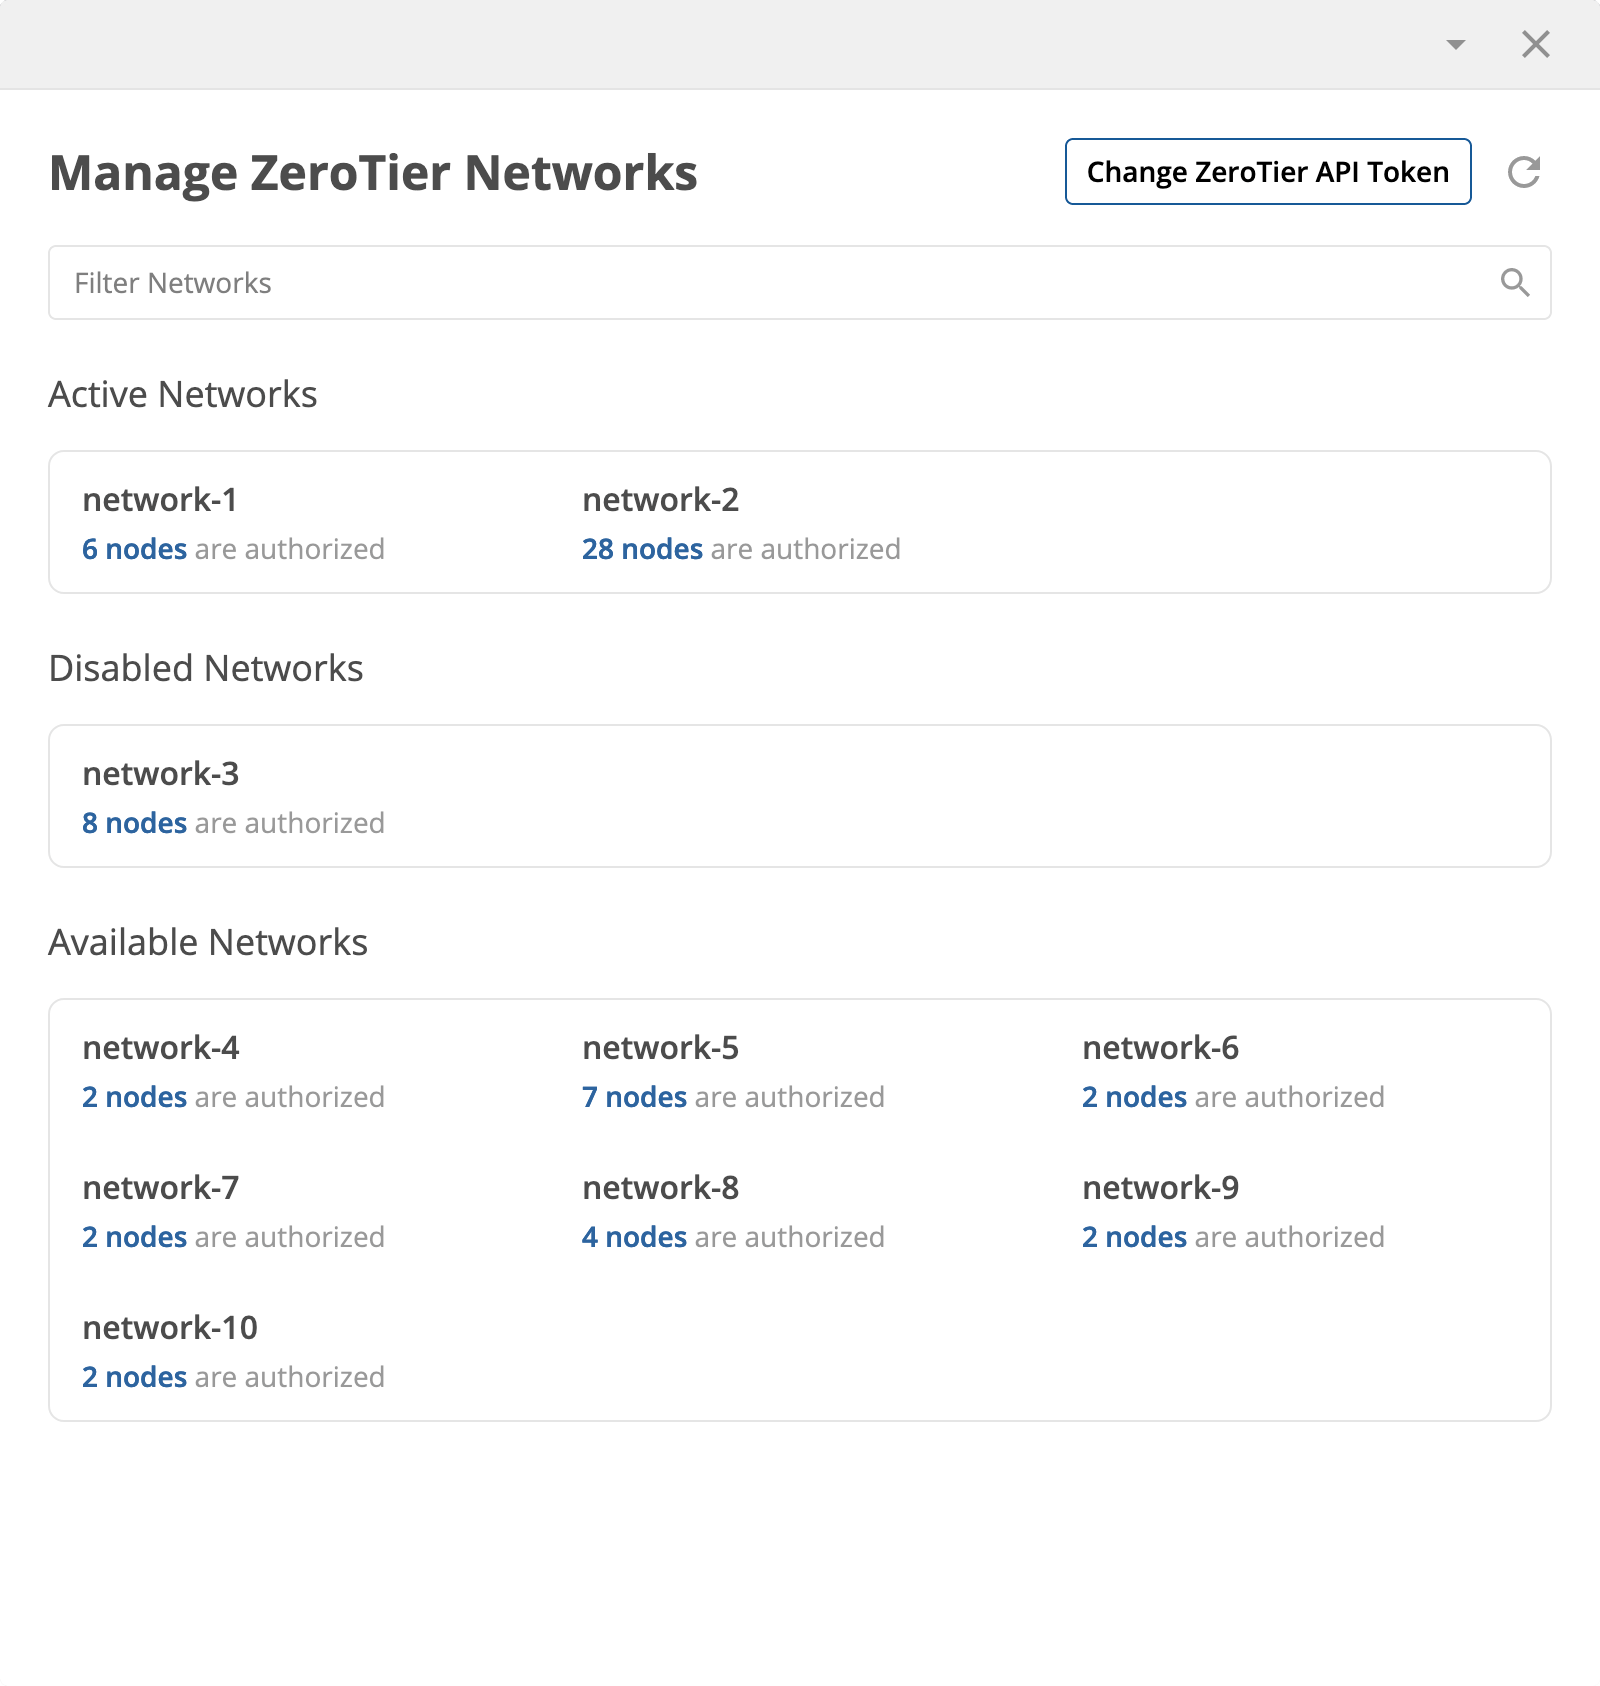


 and creative.space desktop
  applications.
 . After that, click
  .
. .
. to select the network you want to add your workstation to.
 .
. . Next, type a memorable name for your workstation into
  . Finally, click
  to send an invitation to the email associated with your creative.space login.
 .
. to enter the username you use to connect to your node, and use
  to enter the password you use to connect to your node. Then, click
  .
.